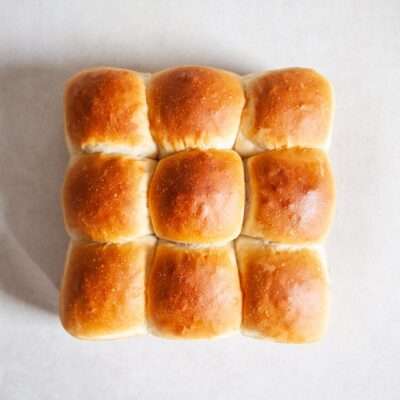
Bread Buns
When I decided to make Indian Vada Pav, the most difficult ingredient to find was not seedless tamarind, besan flour, or pure hing. It was the natural vegan bread buns that proved non-existent. So ultimately, I decided to bake them myself. And as so often, a decision made out of necessity led to a revelation for which I am now eternally grateful.
Ingredients
- 20 g fresh yeast or 7g dried yeast
- 1 tsp golden granulated sugar
- 40 g olive oil
- 230 ml warm water
- 400 g bread flour
- 8 g salt
- 2 tbsp non-dairy milk
- 1 tbsp maple syrup
Instructions
- Crumble the yeast into a medium-sized mixing bowl. Add the sugar, oil and water and stir with a fork to dissolve.
- In a large bowl, whisk together the flour and salt, pour in the dissolved yeast and use your hands to mix everything into a rough dough. Tip out the dough onto a work surface and knead it until it becomes too sticky to handle. Then simply cover it with a bowl turned upside down and let it rest for 10 minutes. The flour will continue to absorb the water, which kickstarts the gluten development and makes it easier to handle.
- After the 10 minutes, it will still be too sticky to knead. Instead we’re using a technique called Slap & Fold (watch here), which allows us to handle doughs with a higher hydration without adding more flour. That way our final buns will be extra pillowy. Start by lifting up the dough, then slapping one end of it back onto the work surface. Now fold the other end (the one you’re holding) over the dough, thereby stretching it slightly and developing the gluten structure. Turn the dough by 90° and repeat. Try to do this in confident and quick movements to avoid the dough from sticking to your hands. After a few turns, you will notice the dough beginning to firm up. You can now give it a knead until it becomes too sticky again, then simply repeat the Slap & Fold. Work the dough this way for around 10 minutes, until it feels soft & pliable and less sticky to the touch. Shape it into a large ball by stretching it with both hands curbed around it towards you over the surface. It should spring back when you poke it. Grease a large bowl with oil and transfer the dough. Then cover it with a damp kitchen towel and leave to proof and double in size for 1 hour.
- Deflate the dough by punching it down a little bit, then divide it into 9 equal portions (roughly 70g - 75g per each). Grease a small baking dish (mine is 23cm x 23 cm) with oil, then shape each piece of dough into a ball by stretching it over the surface in circular movements with one hand. You really want to stretch the dough here to create a smooth surface across it. Think of it as a skin that drapes around the rest of the dough and traps the air while baking, which allows it to expand beautifully. Place the finished balls into the baking dish, cover again with the damp towel and let them double oncer more for 45-60 minutes.
- In the meantime, pre-heat the oven to 220°C. Once the buns are ready, combine the non-dairy milk of your choice with the maple syrup and brush it over the buns. Then bake them for 20-25 minutes until golden brown, turning the tray 180° halfway through for even baking. Let them cool down for 30 minutes to allow them to soften before serving.