About Sourdough
Learning to bake your own Sourdough Bread is a journey towards food mindfulness. Take away the water and salt and suddenly sourdough is made with just one ingredient. Flour. The rest is a fine balance of time, knowledge and skill.
It’s a rewarding process. Not only because you learn to appreciate a single ingredient and its nuances, but because there’s the physical joy at the end of it. A freshly baked loaf of bread. The simple act of cutting it open and noticing the puffs of steam fill the room with a mouthwatering scent, must be one of the most humbling pleasures known to mankind.
The sourdough opposition often tap their fingers at their imaginary watches while wiping sweat from their forehead. Don’t worry. Although the process of baking a loaf of bread is time-intensive, many bakers have found ways to integrate it into the busiest of schedules. Sourdough should take time. It’s during the several hours from mixing the dough to baking the bread that the loaf builds its flavour. And it’s an enriching process that, if you give it a little bit of attention, will accompany you for the rest of your life.
For me, starting to bake my own bread really was the inauguration of my wider curiosity for food. Once you understand the principles of bread, the effort it takes to achieve a beautifully risen loaf, you can apply it to all food. Suddenly, the sun shines brighter and the birds sing louder as you appreciate that good food, and the ingredients that make it, cannot be rushed. If we let them express themselves, they might just reward us with a new pair of eyes to see what it takes to eat well.
Before you start
What is sourdough? Sourdough is made with wild yeast and lactic bacteria. They naturally occur all around us. In the flour, on our hands and even in the air. When we combine flour and water, these microorganisms become active and begin feeding on the sugars (enzymes) that are naturally in the flour. As a side product they create lactic acids, which causes the fermentation and gives acidity to the sourdough, and carbon dioxide, which allows the bread to rise and creates the beautiful open crumb.
The Sourdough Starter
Because sourdough bread is made with just three ingredients (flour, water and salt) we first need to cultivate our own wild yeast by means of a sourdough starter. It takes around a week to make your own starter from scratch. During that time, you cultivate the organisms into a reliable culture that ferments the dough and therefore rises and falls in volume predictably. Once it is ready, you can regard it as a living organism that needs to be fed every day (if kept at room temperature) or once a week (if kept in the fridge) in order to keep alive.
In a nutshell, the microorganisms consume the enzymes (sugars) in the flour, during which the mix of flour and water increases in volume. Once all of the enzymes are consumed, the volume decreases as the starter becomes more and more acidic. In order to maintain the culture, it needs fresh flour (aka fresh enzymes aka fresh food). Instead of adding fresh flour and water to the same batch, we only carry over a small amount of the existing culture, which can then thrive in the healthy environment.
There are two extremes when it comes to feeding a sourdough starter. If we feed it too infrequently, the culture becomes increasingly acidic and begins to break down its foods into liquid and waste. A byproduct of that is alcohol (called hooch), which indicates that the starter is hungry. After a while it will begin to die down. If we feed it too often, the bacteria might suffocate before they have a chance to multiply in the new environment, which will ultimately also deplete the culture. To avoid these extremes, don’t feed your starter before it peaks in volume and do feed it at least once every 24 hours. If kept in the fridge, this process slows down to around 7 days and thus only needs to be fed once a week.
Once the starter is active, it takes around 6-8 hours after feeding for it to reach its peak, at which it doubled or even tripled in volume and can be used to ferment a dough for baking. The speed of the fermentation is dependent on several factors such as temperature (warmer = faster) and what kind of flour is used (rye flour ferments faster than wholemeal, while wholemeal ferments faster than bread flour). As the starter ferments, you will notice a difference in smell as it ranges from sweet (young) to acidic (mature). More mature starters will also ferment a dough faster than younger starters, which should be kept in mind when following exact measurements in recipes.
Because every sourdough bread baker will be spending some time their sourdough starter, it will quite quickly grow dear to their heart. That’s why most baker’s have a name for theirs. Mine is called Hermann, naturally. What’s yours called?
Making your own Sourdough Starter
Ingredients
-
Bread Flour
-
Wholemeal Flour
Less refined flours contain more nutrients, which help with the growth of the culture. Using a mix of bread flour and wholemeal flour is therefore a good balance between achieving a neutral starter and a healthy growth.
Method
- Start by weighing out the food for your sourdough starter. In a large jar, mix together 500g of strong white bread flour and 500g of wholemeal flour.
- Day 1: Stir 100g of the flour mix and 100g of lukewarm water until well combined into a thick batter. Store the mixture in a jar (not metal) and cover with a clean kitchen towel. Keep in a dark place for 2 days.
- Day 3: Over the last 48 hours, you might have seen bubbles form on the side and the surface. The starter will begin to smell fermented and taste acidic. Quite often, there is a sudden increase in volume, before it returns to the previous level. These are signs that it is ready to be fed daily. To do so, discard roughly 80% of the previous day’s batter and add 50g of the flour mix and 50g of lukewarm water. Mix, cover with the towel and store again in a dark place. Repeat both the discarding and the feeding every day and try to do this around the same time each day so that there’s a 24-hour window in-between. After the initial burst, your starter might slow down a little bit. That’s normal. Keep feeding it daily until it doubles or triples in volume at around the same time of the day. It usually takes between 7-10 days for a reliable culture to form.
- Congratulations! Your starter is ready. It’s always a good idea to keep a backup of your starter. Simply pop 10-20g into a freezer bag and store in the freezer. It will keep for at least a year. When needed, defrost it and feed it a couple of times until it springs back into the fermentation cycle.
Want to be on the safe side or simply save some time?
I also offer my sourdough starter Hermann for sale (don’t worry, he’s cool with it).
Sourdough Country Loaf
Theory
Once your sourdough starter is active, you can face the task of baking your first traditional Sourdough Bread, the Country Loaf. Albeit slightly challenging, it’s an instructive insight into the world of sourdough as it gives you an understanding of how the dough and its gluten structure changes throughout the fermentation process. As baking with sourdough is always dependent on various factors, there are a few key lessons to learn, so that you are able to react to the dough instead of only following a recipe.
The Leaven
The starter culture that is mixed to ferment a dough is called the leaven. It is essentially the same as your sourdough starter, just that this time you feed your starter to be ripe at a specific time with a specific weight. If your sourdough starter has been sitting in the fridge for a while, it’s a good idea to feed it once before making your leaven so that it has time to build its full strength.
You will always create a leaven slightly larger than you actually need, so that you can use the leftover to continue your starter. Thus, you don’t need to keep any of your old sourdough starter.
Flour
Each flour has its own characteristics that will ultimately affect your dough and its fermentation process. First and foremost, gluten is essential as it is the complex gluten network that traps the carbon dioxide and allows the dough, and eventually the bread, to rise. To find out how much gluten is present in a pack of flour, read the nutritional info on the bag. The more protein the flour has, the more gluten it can build. All-purpose flour has between 8-12% protein, while strong bread flour starts at around 13%, which results in a more complex structure and also makes it easier to handle. It’s also worth noting that higher protein flour absorbs more water. So if you’re using all-purpose flour, you’ll need to add less water for the same amount of flour. Wholemeal Flour is made from the entire grain of wheat, including the bran and wheat germ, and therefore retains more of its natural nutrients. It absorbs even more water than strong white bread flour, so adjust your water percentage if adding more or less wholemeal.
Hydration
Bakers use the word hydration to describe the ratio of water:flour. The higher the hydration, the better the crumb inside the bread, but also the harder it is to handle the dough.
The recipe below makes a 70% hydration bread, meaning it uses a total of 350g of water to 500g of flour. This is a good starting point for your first loaf, but there is room for improvement. As you get more confident, try to increase the amount of water in small increments and see what difference it makes to the final loaf.
Autolyse
When mixing flour and water, the gluten inside the flour begin to cling together, thereby building a network of chains that help to trap the carbon dioxide. This process is called autolyse. You’ll notice that the salt is only added afterwards. This is because salt would slow down the initial process of the gluten forming. Later on, salt is however essential not only to protect that very structure, but to also give flavour to the bread.
Bulk Fermentation
After the autolyse, the salt and remaining water are added to the dough, which marks the beginning of the bulk fermentation. It is the first of two rises and it is at this stage that we help the dough to develop a strong gluten structure. A common method to do so is the Stretch & Fold technique. Conventionally, we would knead the dough to create a strong structure. However, as we’re working with higher hydration, the dough would stick to our hands and the surface. Instead, by stretching and folding the dough in intervals, we receive the same result.
The length of the bulk fermentation is dependent on the flour you are using. For instance, wholemeal flour ferments faster than bread flour. But it’s also highly dependent on the temperatures you’re working in. Warmer temperatures speed up the fermentation, while colder ones slow it down. Over time, you’ll be able to recognise and adjust your timings. On average, the bulk fermentation takes around 3 – 4 hours. Keep an eye on the dough and notice how it changes in-between every set of Stretch & Fold. When the dough begins to aerate, with small bubbles forming on the surface and the side, it is time to move on. You can also do the windowpane test to see if the gluten is strong enough. Simply stretch out a small piece of dough. If you can stretch if far enough so that you can see your fingers through the dough without it ripping, you’ve achieved a strong gluten structure.
Pre-Shaping
Once the gluten structure is strong enough, we can begin shaping the dough into a loaf. This is usually done in two stages. During the first stage, the pre-shaping, the baker usually divides the entire batch of dough into individual loaves. The pre-shaping further strengthens the gluten by creating tension across the dough. So even if you are only working with a batch for one loaf, it is useful to pre-shape.
There is a fine balance between not building enough tension and overworking it. Thus, it can happen that the dough either cannot hold its shape very well or that the thin skin that holds the dough together rips. Pre-shape the dough until a smooth skin holds the dough in place. Look for well-rounded edges that cast a shadow onto the surface around the dough. After the bench rest, the short break after pre-shaping, the round edges and shadows should still be there. If the dough flattened to a flat disk, simply pre-shape again to build more tension. If the skin rips, it is unlikely that the dough will still hold its shape afterwards. You can still bake it though and it’s an important lesson to get a feeling for when the tension is overdone.
Final shaping and Final Rise
After the bench rest, the dough is shaped a final time and transferred straight into a proving basket. Often, rice flour is used to dust the basket. As rice flour doesn’t contain gluten, the dough absorbs it less effectively, which creates a nice barrier between basket and dough. If you don’t have rice flour, you can use rye or just wholemeal flour, but you might need to use a little bit more.
Baking the Country Loaf
Professional bakery ovens have the ability to inject steam into the ovens, which creates an environment in which the dough rises beautifully but delays the caramelisation of the sugars in the flour. That way, the dough reaches the perfect volume without turning too dark. This part of the baking process is called the oven spring, as it is during the first half that the dough reaches most of its volume. Afterwards, the steam is ejected and the final bread reaches the desired colour.
To recreate a similar environment, home bakers can use a Dutch Oven, which is essentially a closed casserole. By keeping the lid on the casserole, the steam from the evaporating water inside the dough is trapped. Once the lid is removed, the steam escapes and the bread caramelises. Alternatively, bakers can use a tray of water alongside their dough to generate steam. Bear in mind that fan settings extract the steam, so a conventional setting is preferred for this method.
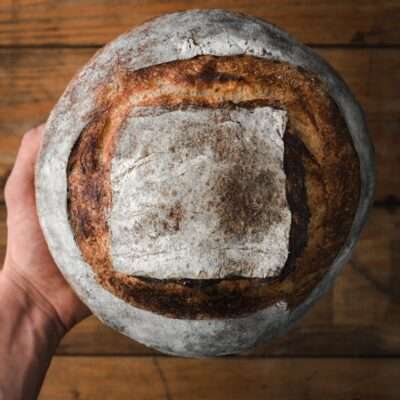
Before the dough is placed into the casserole, the baker scores its surface with a sharp blade. The scoring is not only done to give the bread a beautiful aesthetic, but to allow the full rise. As the bread rises, the skin bursts. By scoring the dough, we pre-determine where that burst happens and give it a bit of guidance.
After Baking
To check if your bread is fully baked, tap the bottom. If it sounds hollow, it’s done. Allowing the bread to cool entirely before slicing it will improve it’s “shelf-life.”. However, only few can resist the temptation of a warm slice of freshly baked bread and, especially if it is your first sourdough loaf, I throughly encourage you to commit to this humble mistake.
In general, the bread will begin to go stale after 24 hours, but it freezes exceptionally well when sliced. Simply pop a frozen slice into your toaster whenever you fancy your homemade bread.
Baking with sourdough takes a bit of practice. But with every loaf you will see and taste your improvement. Keep going. However challenging it may be, by the time you take your first bite, it all has been worth the while.
Baking your own Country Loaf
Ingredients
- For the leaven:
- 20g leaven
- 50g flour mix (see above)
- 50g water
- For the bread:
- 325g water + 25g
- 450g strong bread flour
- 50g wholemeal flour
- 10g salt
- Rice flour
Method
- 6-12 hours before mixing your dough, make your leaven by mixing 20g of your starter with 50g of the flour mix and 50g cold water.
- To start your dough, dissolve 100g of the leaven (use the rest to feed your starter) in 325g lukewarm water. Add all of the flour and mix thoroughly, then cover it with a clean tea towel and rest for 30 minutes. In the meantime, feed the remaining leaven to continue your starter.
- After thirty minutes, add the salt and the remaining 25g water. Squeeze the dough through your fingers to incorporate everything, then fold it on top of itself a few times. Cover the dough and rest for 45 minutes.
- Now it is time to complete three sets of the Stretch & Fold technique. To complete one set, moisten your hands with some water and loosen the dough. Then stretch a corner of the dough as far as possible without ripping and fold it back over the centre. Continue with the next corner, going around the dough as if it was a square. Continue stretching the dough until it begins to firm up. Cover and rest for 45 minutes.
- After the last set and its 45 minutes rest, lift the dough onto a lightly floured surface so that the smooth side is facing down. Going once around the dough, stretch and fold it inwards just beyond the centre until it forms a ball, similar to the technique you’ve used before. Then, with curbed hands, build more tension by pulling the dough towards you over the surface. Turn the dough 90 degrees and repeat until the skin stretches until the dough looks plumb and holds its shape. Be careful not too overdo this step or the skin of the dough might tear. Turn it around so that the smooth side is facing upwards, cover it and leave it to rest for 20 minutes.
- Lightly dust a proving basket with rice flour. Alternatively, use wholemeal flour. If you don’t have a proving basket, use a bowl and line it with a clean tea towel. Flip the dough over and repeat the folding technique until you have a plumb dough. Place in the basket/bowl with the smooth side facing down. Then proof for 3 to 4 hours at room temperature or for 8 to 14 hours in the fridge.
- Place your casserole or tray into the oven and pre-heat to 250° C (230° C fan). Once the oven is hot, take the dough out of the fridge and gently tip it out onto a floured board. Score the top of the dough with a razor blade or sharp knife and place in the casserole (dusted with flour) and close the lid, or place on a tray with a separate tray filled with water on a lower rack. Bake for 25 min. Remove the lid or water tray and bake for another 25 min. Cool on a wire rack. Enjoy!
A timeline for your sourdough
Below is a suggested timeline that can easily be adjusted to your personal situation. You can mix the dough in the morning and bake the bread in the evening, or start later in the evening and bake it later the next morning. Each step in the timeline is allocated either 5 or 10 minutes to be completed, depending on how complex it is. All in all, from first mixing the dough to leaving it to rise, takes around 4 1/4 hours for which you need to be in proximity of the dough, but only 30 – 50 minutes actual work.
-
Between 6 am and 12 pm (midday): Make your leaven
-
6 pm: Mix the dough
-
6:40 pm: Add the salt and the remaining water
-
7:30 pm: First set of Stretch & Fold
-
8:20 pm: Second set of Stretch & Fold
-
9:10 pm: Third set of Stretch & Fold
-
10:00 pm: pre-shape the dough
-
10:30 pm: final shaping
-
The next day between 06:40 am – 12:40 pm (midday): Bake your bread
Sourdough Starter & Country Loaf
Ingredients
For the leaven
- 20 g leaven
- 50 g flour mix (see above)
- 50 g water
For the bread
- 325 g water (+ 25g)
- 450 g strong bread flour
- 50 g wholemeal flour
- 10 g salt
- Rice flour
Instructions
- 6-12 hours before mixing your dough, make your leaven by mixing 20g of your starter with 50g of the flour mix and 50g cold water.
- To start your dough, dissolve 100g of the leaven (use the rest to feed your starter) in 325g lukewarm water. Add all of the flour and mix thoroughly, then cover it with a clean tea towel and rest for 30 minutes. In the meantime, feed the remaining leaven to continue your starter.
- After thirty minutes, add the salt and the remaining 25g water. Squeeze the dough through your fingers to incorporate everything, then fold it on top of itself a few times. Cover the dough and rest for 45 minutes.
- Now it is time to complete three sets of the Stretch & Fold technique. To complete one set, moisten your hands with some water and loosen the dough. Then stretch a corner of the dough as far as possible without ripping and fold it back over the centre. Continue with the next corner, going around the dough as if it was a square. Continue stretching the dough until it begins to firm up. Cover and rest for 45 minutes.
- After the last set and its 45 minutes rest, lift the dough onto a lightly floured surface so that the smooth side is facing down. Going once around the dough, stretch and fold it inwards just beyond the centre until it forms a ball, similar to the technique you’ve used before. Then, with curbed hands, build more tension by pulling the dough towards you over the surface. Turn the dough 90 degrees and repeat until the skin stretches until the dough looks plumb and holds its shape. Be careful not too overdo this step or the skin of the dough might tear. Turn it around so that the smooth side is facing upwards, cover it and leave it to rest for 20 minutes.
- Lightly dust a proving basket with rice flour. Alternatively, use wholemeal flour. If you don’t have a proving basket, use a bowl and line it with a clean tea towel. Flip the dough over and repeat the folding technique until you have a plumb dough. Place in the basket/bowl with the smooth side facing down. Then proof for 3 to 4 hours at room temperature or for 8 to 14 hours in the fridge.
- Place your casserole or tray into the oven and pre-heat to 250° C (230° C fan). Once the oven is hot, take the dough out of the fridge and gently tip it out onto a floured board. Score the top of the dough with a razor blade or sharp knife and place in the casserole (dusted with flour) and close the lid, or place on a tray with a separate tray filled with water on a lower rack. Bake for 25 min. Remove the lid or water tray and bake for another 25 min. Cool on a wire rack. Enjoy!
Notes
- Between 6 am and 12 pm (midday): Make your leaven
- 6 pm: Mix the dough
- 6:40 pm: Add the salt and the remaining water
- 7:30 pm: First set of Stretch & Fold
- 8:20 pm: Second set of Stretch & Fold
- 9:10 pm: Third set of Stretch & Fold
- 10:00 pm: pre-shape the dough
- 10:30 pm: final shaping
- The next day between 06:40 am - 12:40 pm (midday): Bake your bread
Video
@bakinghermann Let’s bake some sourdough bread. #sourdough #baking #fyp #tiktokfood #sourdoughbread #vegan @tiktok_uk ♬ original sound - Julius Fiedler


This was delicious! It seems like a lot of steps but it was worth it
It’s definitely a labour of love, but I found it very rewarding when I made my first sourdough loaf. Creating something artisanal out of just flour and water! I’m glad you liked it.